Saturday 30 July 2011

Wild Raspberry Raw Pie

What I did today:

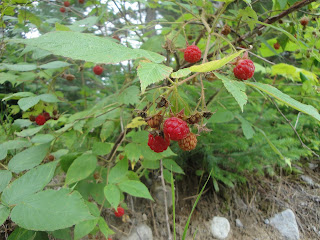
Walked outside & picked some wild raspberries, no pesticides, herbicides or fertilizers. 


& then made a pie with them!


I love days like these.  Shouldn't all food be this simple?  Here's the recipe:

Wild Raspberry Raw Pie

CRUST -
  • 1 cup raw nuts (I used a mix of almonds and sunflower seeds)
  • soaked raisins
PIE FILLING -
  • 1 cup raspberries (it's nice if their wild, but I know this isn't possible for everyone)
  • 1 cup raw cashews, soaked until soft & then rinsed
  • 1/4 cup coconut oil
  • Raw sweetener (honey, agave, stevia), added as desired
  • 2 tablespoons lemon juice, freshly squeezed
First make the pie crust by grinding the raw nuts into a powder using a food processor.  With the food processor running add the raisins slowly until the mixture begins to form a ball.  You may need to occasionally stop the machine to scrap down the sides.  Press the crust into a cake pan and put in the freezer while you prepare the filling.

It almost seemed a shame to mash up these little ruby spheres of raspberry goodness.  Nothing like the ones you get in the grocery store.


But ya can't make wild raspberry raw pie without breaking some raspberries. 

Okay so for the filling, simply blend everything in a blender until creamy & smooth.  If you don't have a high speed blender (as I don't), you'll have to do a bit more work.  Add a little bit of fresh water to the blender and add the cashews one handful at a time.  You will have to keep stopping the blender and stirring quite frequently.  If you add more water it will blend faster, but then you will have a less dense pie that falls apart when it's cut.  So try to add as little water as you can - it's worth it in the end.  Once the cashews are blended well, add the rest of the ingredients.

Pour the filling into the crust and leave in the fridge for a few hours to set up.


I've heard rumours that there's blackberries around these parts too.  Mmmmm wild blackberry raw pie!  Possibly a future post (unless I find something else creative to do with them).

But for now I'm enjoying the wild raspberry raw pie goodness ...


Who wants the last piece?

As I mentioned before, I don't have a high speed blender (Bullet budget, Vita-Mix dreams), so I had to slowly add the cashews and stop the blender constantly to stir.  But it was completely worth it, when I cut that first dense, decadent piece.

I bet those wild raspberries would be good in my raspberry raw serve too.


Have you ever scavenged in your backyard for edibles?  This was my first time using wild raspberries, but definitely not my last.

Wednesday 27 July 2011

Chinatown Chic Refashion

Here's my current situation: I have a cute pink chinois top that I don't really wear anymore (it's backless ... a relic from my previous life where I went out to lots of parties).


... AND a bamboo handle purse in a pattern I hate.


Hmmmm ...

Hey, why don't I combine the two to make a cute Chinese-style bamboo handled purse?  Well that's exactly what I did.


The whole thing was super easy and took me probably no longer than 30 minutes.  First I removed the collar from the top.  I love the Chinese style button.  I have to think of something fun to do with it.


Then I cut off the two long straps on each side.  The fabric comes to a point here where the straps were attached.  I decided to use these points for attaching the handles.  With right sides together, I folded the fabric into a rectangular shape and stitched the sides together leaving the pointed ends open.


Then I turned right sides out.  Folded each of the pointed ends over a bamboo handle and hand stitched them to secure.


Super easy, uber chic and 100% recycled/reused materials.  I love it!


I would love to do this with some old sari material and the square wooden handles they use in South India.  Future project for sure.  But for now I'm happy with my Chinese-Bamboo bag.


Happy re-fashioning!

Thursday 21 July 2011

Raw Chai Cookies (nut-free)

Remember my raw, vegan & sattvic chai spiced chia pudding?  I promised to provide you with another Indian spiced recipe, and here it is (a promise is a promise after all)!

In India they have masala cookies, not raw, probably not vegan and definitely not sattvic (lots of hot spices, onion & garlic).  But I tried them anyway :)  They pack quite a punch, but so do my raw version and I like them better anyway.

Inspired by my trip to India, when I got back home I decided to experiment in the kitchen and see what I could whip up.  I'm getting a lot more adventurous now, but unfortunately I don't remember any of the measurements I used (sorry!).  Like all the recipes I feature on my site these cookies are super easy to make and use only simple ingredients.  You'll need a food processor for this one.

Raw Chai Cookies (sattvic)

  • uncooked oats (not the quick cooking kind)
  • raisins, soaked until plump
  • freshly ground spices : cinnamon, cardamom, ginger, nutmeg, star anise
In the food processor blend some oats until it becomes a fine powder.  Scrap the sides and add in the spices.  If you have a spice grinder, freshly ground spices will make these cookies taste divine.  If not, pre-ground spices will work too.  Pulse to combine the spices with the oats.  Then with the food processor running, add the raisins until the mixture begins to form balls.  The dough should stick together when you squeeze it in your hand.  

The raisins are enough sweetener for me, but at this point you can taste the dough and if you'd like it more sweet you can add in some raw sweetener such as agave, stevia or honey. This was definitely a sampling kind of recipe for me.  I kept tasting the dough as I went along and adding what I thought it needed to taste nice.  I used much more cinnamon than the other spices.  I used just a little of the nutmeg.

When you're happy with the dough, roll into balls and they are ready to consume.  Store in the fridge ... but I'm sure you already knew that.  This isn't rocket science, it's raw cookie balls!

Kind of reminds me of the raw pecan pie cookies I made a few years ago (Ani Phyo's recipe).  My raw chai cookies are nut free.  Oats are also less expensive than pecans, which is nice if you're making a big batch.
And of course the plethora of raw vegan & sattvic donut holes too!  Lots of good recipes and photos to drool over in that post!!


Now get out your food processor and make some raw cookies!

Sunday 17 July 2011

Raw Cashews: Are They Really Really Raw?

There's a controversy about raw cashews in the raw food community.  The majority of cashews packaged and labelled as raw are in fact not raw when using the definition of heating below 116°C.  In order to get that little piece of heaven known as a cashew out of it's thick, hard shell, the entire nut must be heated.  Also the raw oil inside the cashew shell can burn your skin if you're unlucky enough to come in contact with it.
SoooOooo what's a raw food girl to do?

... well go to India of course and pick that cashew right off the tree & eat it raw!


Okay so you don't have to go to India, there are lots of other countries that grow cashews too, but this is my story of truly 100% RAW cashews.

The picture above are some of the cashews I picked.  The place where I was teaching had lots of trees with edibles growing on them - cashews, almond, mango, coconut, chikoo (sapodilla) and guava.  I didn't even realize what was growing on this tree until a local told me and showed me how to get the cashew out.

The large red-yellowish fruit is what they call a cashew apple.  It's sweet, juicy and astringent tasting, meaning it hits the back of your throat with a dry taste.  The apple was okay, but I lived for the flavourful cashews inside the shells.  I found lots of cashew nuts on the ground around the cashew trees.  Monkeys often eat the cashew apples and then throw away the nut.  Crazy monkeys!

Once the cashew's hard shell turns grey it can't be consumed raw.  It will have to be heated over a fire and then cracked open (we did that one night too!).  The green ones, however have a softer shell and can be split open with a knife.


As I mentioned before the oil inside the cashews can burn, so being completely new to opening up cashew shells, I wasn't about to get out my knife and go at it.  Another yoga teacher, a local to the area, did it for me.  He was always careful to wrap a cloth rag around the hand that was holding the cashew to make sure once the shell was open the raw oil wouldn't get onto his skin.  He removed the unripe cashew apple and sliced the nut right down the middle.
   
Isn't it just so cute?  Then using the tip of the knife, he carefully removed the cashew from the shell and placed it inside a napkin to remove the oil.  Once the oil was all soaked up we could eat the nut. 

When my friend first handed me a raw cashew to eat I didn't chow it down immediately.  I was a bit apprehensive because of the raw oil that he said could burn my skin and because the nuts still had a slightly greenish tinge (I know weird, me not wanting to eat something green).  But I decided to be adventurous.  So I took a deep yogic breath and popped it in my mouth. 

I liked the fresh taste immediately.  It was softer than the "raw" cashews you buy here in the stores and had a slightly sweet taste.  It tasted fresh and abundant with living energy.  I realized that what I previously considered a raw cashew was absolutely not raw, at least not as alive as this cashew. 

I would have loooooOooooooved to make a raw dish with these nuts.  Maybe a raw sattvic sauce to drench zuke noodles in or a raw mango cheesecake.  But alas that just wasn't possible.  It would have been too labour intensive to hand split enough cashews.  But also I didn't have access to a blender or food processor.  This was rural India!

After my raw cashew experience I got a lot more adventurous with picking things off the tree and eating it.  If it's good enough for the monkeys ... 

No pesticides, no artificial fertilizers, just living raw goodness!


This is an unripe green mango.  Love these!  You can even eat the skin.  I didn't even bother to wash it first LOL!  It has a much more tart taste than the ripe mangoes.  These green mangoes are used a lot in India to make hot sauce, called pickle.  I ate quite a bit of that too ;)

Now that I'm back home in Canada there will be no more truly raw cashews (or green mangoes for that matter), but I'm okay with that.  After all I'm a yogi, which means I'm flexible. 

Tuesday 12 July 2011

Mint Chocolate Chia

This invigorating chia seed pudding is reminiscent of mint chocolate chip ice cream, but better!  A few weeks ago I first tried soaking a tea bag in some raw nut milk to make a chai chia pudding.  The results were amazing, and it got me thinking about all the millions of other possibilities - there's a lot of teas out there.

I know some raw food makers use extracts, but that's just not my style.  With the exception of vanilla extract, they are hard to find and expen$sive, especially if you're making something raw and sattvic and therefore need an extract that is alcohol free.

So tea is the way for me! 

Mint Chocolate Chip Chia


First decide on the "milk" you will use.  I used a raw almond milk that was made by combining a few tablespoons of raw almond butter with water in the blender.  You could also make a sweet milk by combining a banana with water in the blender (then you don't need to add sweetener later).

I like a somewhat thick chia pudding, so I used 1 cup of liquid with 1/3 cup chia seeds.  Measure out the liquid and let two mint tea bags soak in the liquid for a few hours.  Store in the fridge.  When the liquid is good and minty remove the tea bags and add the chia seeds.  For the chocolate flavour you can use raw cacao powder, but that's not sattvic.  For a caffeine-free version use a few tablespoons of carob powder instead (or you can mix both carob & chocolate powder).  Sweeten as desired with either honey, stevia or agave.  Stir everything together well and put back in the fridge to thicken up.  I like to leave it in the fridge overnight.

The next morning when I got up this minty chocolatey bowl was waiting for me ...


I couldn't believe how good it was ... so minty with a creamy chocolately taste.

You could also add some raw cacao nibs for a real mint chocolate chip experience.

I didn't have cacao nibs, so I added a banana instead. 


It was mint chocolate bliss!!


Next up for my tea soaking adventures?  I think I'll try something with a fruity tea ...

Sunday 10 July 2011

Canada Organic Logo: Spreading Wide & Far

Remember my obsession with the Canada Organic logo and finding it on products in stores?  I remember years ago when I first heard about the plans to create this logo.  A few years later it was launched, and I couldn't wait to find the first one in my hometown.  Slowly, slowly I began seeing the logo on more and more products.

I was pleasantly surprised when I returned home from my trip to find that this logo is now everywhere!  I've seen it on everything from organic soymilk, chips, juice, snack bars, cereals and more.  No, I won't bore you with photos of the logo on all these products ;)

I also discovered that I'm not the only organic nerd that loves finding this logo.  This website created for Organic Week in Canada (which is October 15-22, 2011), apparently also loves finding that little green, white and red logo.  They've even created a Google map of places where it's been seen!  I can't wait to add all my sightings - I have LOTS!
With many companies green washing and tricking customers into believing their products are healthier than they really are, I'm so glad to see the organic logo proliferating.  When shoppers see this logo on food they know the product is 100% certified organic by a third party using Canadian standards.  In other words it makes your shopping an easy no-brainer.
Back to the new website I found .... I didn't realize that there was an Organic Week in Canada, but now that I do, I'll be sure to join in on the festivities.  I don't see anything in my hometown listed under the activities, but it's still a few months away.  Or maybe I could organize something myself ....

Monday 4 July 2011

Sprouts From the Earth

I love fresh crunchy sprouts.  They're good to toss in a green smoothie, or salad or tomato-avocado sandwich.  But what's the fun in buying them when you can grow your own at home.  It only takes a few days.  I've been growing my own sprouts using a strainer for years now.  It's an easy and inexpensive way to grow your own sprouts, but you need to rinse the sprouts frequently with fresh water and pay careful attention to them to make sure they don't dry out.

But then last summer I saw a woman sprouting sunflower seeds in soil.  They grew very quickly, required little water and minimal supervision.  I wanna try!

I found an old shallow tin tray, dug up some soil from my mom's garden (sorry mom!) and planted some seeds.  I placed the tray next to a window and watered.   


The next day there was a tiny little sprout trying to pop out of the dirt to see the sun ...


And then before I knew it all the sprouts were popping their little heads out of the sand dirt.


Over the next 2-3 days the sprouts got taller ...


And taller ...


I love the little "caps" on the sprouts from the sunflower shell.


When I was ready to eat, I simply took some kitchen scissors and snipped off the sprouts just above the soil.  Rinse under cold water and they are ready to be blended or added to soups and salads. 

Next up is wheatgrass ...

Related Posts Plugin for WordPress, Blogger...

Lawyer-ish Stuff:

All content, photographs, and text provided on this site are the property of Shanghai Monkey, unless otherwise specified, and cannot be reproduced in any form without permission of the author. All content is intended for personal use only and cannot be reproduced for sale.


© 2019 Shanghai Monkey. All rights reserved.

ShareThis